Pages

Wednesday, March 27, 2013

AWS VPC NAT Instance Failover and High Availability

Amazon Virtual Private Cloud (VPC) is a great way to setup an isolated portion of AWS and control the network topology. It is a great way to extend your data center and use AWS for burst requirements. With the latest VPC for Everyone announcement, what was earlier "Classic" and "VPC" in AWS will  soon be only VPC. That is, every deployment in AWS will be on a VPC even though one might not need all the additional features that VPC provides. One might eventually start looking at utilizing VPC features such as multiple Subnets, Network isolation, Network ACLs, etc.. Those who have already worked with VPC's understand the role of NAT Instance in a VPC.

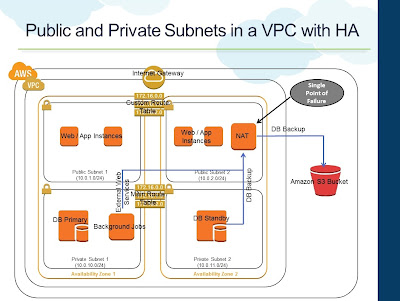
When you create a VPC, you create them with multiple Subnets (Public and Private). Instances launched in the Public Subnet have direct internet connectivity to send and receive internet traffic through the internet gateway of the VPC. Typically, internet facing servers such as web servers are kept in the Public Subnet. A Private Subnet can be used to launch Instances that do not require direct access from the internet. Instances in a Private Subnet can access the Internet without exposing their private IP address by routing their traffic through a Network Address Translation (NAT) instance in the Public Subnet. AWS provides an AMI that can be launched as a NAT Instance. Following diagram is the representation of a standard VPC that gets provisioned through the AWS Management Console wizard.
Standard Private and Public Subnets in a VPC
The above architecture has
  • A Public Subnet that has direct internet connectivity through the Internet Gateway. Web Instances can be placed within the Public Subnet
  • The custom Route Table associated with Public Subnet will have the necessary routing information to route traffic to the Internet Gateway
  • A NAT Instance is also provisioned in the Public Subnet
  • A Private Subnet that has outbound internet connectivity through the NAT Instance in the Public Subnet
  • The Main Route Table is by default associated with the Private Subnet. This will have necessary routing information to route internet traffic to the NAT Instance
  • Instances in the Private Subnet will use the NAT Instance for outbound internet connectivity. For example, DB backups from standby that needs to be stored in S3. Background programs that make external web services calls
Of course, the above architecture has limited High Availability since all the Subnets are created within the same Availability Zone. We can avoid this by creating multiple Subnets in multiple Availability Zones.
Availability Zones
Public and Private Subnets with multiple Availability Zones

  • Additional Subnets (Public and Private) are created in one another Availability Zone
  • Both Private Subnets are attached to the Main Routing Table
  • Both Public Subnets are attached to the same Custom Routing Table
  • Instances in the Private Subnet still continue to use the NAT Instance for outbound internet connectivity
Though we increased the High Availability by utilizing multiple Availability Zones, the NAT Instance is still a Single Point of Failure. NAT Instance is just another EC2 Instance that can become unavailable any time. The updated architecture below uses two NAT Instances to provide failover and High Availability for the NAT Instances
NAT Instance High Availability
  • Each Subnet is associated with its own Route Table
  • NAT1 is provisioned in Public Subnet 1
  • NAT2 is provisioned in Public Subnet 2
  • Private Subnet 1's Route Table (RT) has routing entry to NAT1 for internet traffic
  • Private Subnet 2's Route Table (RT) has routing entry to NAT2 for internet traffic
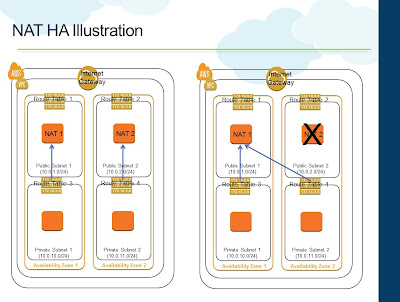
NAT Instance HA Illustration

A script can be installed on both the NAT Instances to monitor each other and swap the routing table association if one of them fails. For example, if NAT1 detects that NAT2 is not responding to its ping requests, it can change the Route Table of Private Subnet 2 to NAT1 for internet traffic. Once NAT2 becomes operational again, a reverse swapping can happen. AWS has a pretty good documentation on this and a sample script for the swapping.

Apart from HA, the above architecture also provides better overall throughput, since during normal conditions, both NAT Instances can be used to drive the outbound internet requirements of the VPC. If there are workloads that requires a lot of outbound internet connectivity, having more than one NAT Instance would make sense. Of course, you are still limited with one NAT Instance per Subnet.

Monday, February 18, 2013

Log Analysis and Archive with Amazon S3 and Glacier - Full Summary

Logging is an essential component of any system and helps you understand what's really going on in the system. Just like how you build systems that can scale, perform performance tweaks, design caching architecture, logging is an area that requires that special care to effectively collect logs and make some meaning out of it.

In the Cloud, and more specifically in AWS, there are numerous options and considerations with respect to logging such as
  • What are the different sources from where you can collect logs
  • How do you collect logs from a dynamic infrastrucuture
  • How effectively logs can be collected without affecting the performance of the system
  • What are the different storage options available
  • And most importantly how one can do it cost effectively
When I set to write on this, I understood that it is going to be a lengthy article with many areas being covered. And logging is an area whose importance is understood only when things go wrong. Otherwise it is pretty boring :) So I decided to split my thoughts in to multiple posts and had been writing about it for the past one month. So this post is a summary of all those different posts.

The Introduction - this is the introductory post setting the context of the different areas that we are going to cover as part of this multi-part post

Part I - in this part, we define the log structure and look at how to collect logs from Amazon CloudFront, the Content Distribution Network service from AWS

Part II - this post describes on how to use the local storage of the EC2 Instance for logging

Part III - part III discusses on how to collect from multiple instances that are dynamically provisioned, how to rotate the log files and store them in a centralized log storage

Part IV - In this final post, we look at what different storage options are available  for cost effective logging, how one can use Glacier, the archival service from AWS, the best practices that one needs to remember and a list of third party / commercial log management solutions available in the market

I hope this of some use to you and provides some insights on logging in AWS. I would definitely like to hear any comments and alternative approaches towards this.

Monday, January 14, 2013

Log archive & analysis with Amazon S3 and Glacier - Part IV

We now have the logs coming from CloudFront, Web/App and Search tier to the centralized log storage in Amazon S3. In this final post of this series, let's now see what are the options at storage level from cost point of view and what to do with mountains of logs.

Using Reduced Redundancy Storage
Amazon S3 has different storage class - Standard, Reduced Redundancy Storage (RRS) and Glacier. By default when we create store any Object in Amazon S3, it is stored under the Standard storage class. Under "Standard" storage class, all Objects have 99.999999999% durability and 99.99% availability of objects over a given year. With RRS, the Objects that are stored in S3 are replicated at fewer locations to give 99.99% durability and 99.99% availability of objects over a given year. RRS comes cheaper than Standard storage. If we are storing 1TB of log files under Standard storage, it would cost about $95/month (in US-Standard region). Under RRS the same 1TB of storage would be $76/month.

The RRS option cannot be enabled at bucket level but rather at individual Objects level. We can enable RRS for the logs folders that we created through the Object properties

Enable S3 Reduced Redundancy Storage

Log Analysis
We can now initiate Elastic Map Reduce jobs to process these log files and produce log analytics. Elastic Map Reduce takes a S3 bucket as the input source location. We can point the "log" bucket as the input source and supply a Map-Reduce implementation to EMR to crunch the logs.

Yearly Analysis / Multi Year Analysis
Certain requirements want an on-off analysis to be performed at the end of an year. For example, we may perform monthly or on-demand analysis of the log data regularly. And at the end of an year we may require an analysis against the entire year's data and compare it with previous years. For such cases, if we maintain multi-year log files in S3, the cost of storage might be very high. And previous year log files will be accessed only once in an year. For such reasons, we can archive the older log data to Amazon Glacier. Amazon Glacier provides low cost archival service for $0.01 per GB per month.

Archiving to Glacier
We will not be storing the log files forever. Typically any application will have a requirement to store log files for certain period of time beyond which they can be deleted. Let's say that we are interested in retaining only last 6 month's log files. And occasionally we might be doing one year or three years analysis. In such cases, we can use set Lifecycle policies in S3 to automatically archive to Glacier beyond a certain period of time. We can also instruct S3 to automatically deleted Objects beyond a certain period of time.
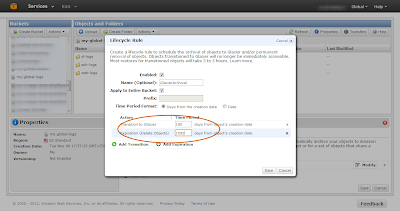
  • Click on the bucket properties and navigate to the "Lifecycle" tab
  • Click on "Add Rule" to create a new "Lifecycle Rule"
  • Specify that the rule needs to apply for the entire bucket and create a "Transition" and "Expiration" rule
  • Create a "Transition" rule specifying "180" days. This will automatically move files from the S3 bucket to Glacier after 180 days
  • Create an "Expiration" rule specifying "1095" days. This will delete the log files automatically from S3 or Glacier after 3 years
Lifecycle Rules to Archive to Glacier and Delete Log Files
With that the log files will get automatically archived to Glacier after 6 months (from creation) and will be deleted after 3 years. Once the log files are archived to Glacier, the storage class of these log files (objects) in S3 changes to Glacier indicating that they are being stored in Glacier.
S3 Storage Class for archived files
Restoring from Glacier
For our year end analysis, we will need the archived data in Glacier back in Amazon S3 so that we can run Elastic Map Reduce jobs against them to produce our year-end / multi-year analytics information.  We can do this through the AWS Management Console by
  • Right clicking the particular object (log file) whose storage class is Glacier (meaning it is archived) and "Initiate Restore"
  • Specify, how long we require the Object in S3 for us to perform the analysis and complete the request
Once this request is initiated, it normally takes around 3-4 hours for AWS to restore the object from Glacier to S3. The "Object Restoration" process can be done only at an individual object level. We will normally have large number of log files at the end of an year, and doing this way is not practically possible.

Restoring from Glacier programmatically
Restoring from Glacier is essentially a S3 operation and not a Glacier operation as it seems to be. We need to use the S3 API to initiate restoration

AmazonS3 s3Client = new AmazonS3Client(new BasicAWSCredentials("aws-access-key", "aws-secret-access-key"));
ObjectListing listing = s3Client.listObjects(new ListObjectsRequest()
             .withBucketName("my-global-logs")
             .withPrefix("web-logs/")); 

The first step is to list all the keys of the Objects that we want to restore. To do this, use the S3 ListObjects API call to list all the Objects. Few pointers while using this API
  • Specify the bucket name that we want to list. Also include a prefix if we are interested in restoring only a specific directory within that bucket. For example, if we are interested only in performing analysis against the web-logs and not others, we can specify as indicated above
  • Since a bucket can contain 1000's of Objects, S3's API does pagination when sending the response. Hence use the "isTruncated" method in the response "ObjectListing" to check if there are more Objects. If so, initiate further API calls to list till the end
  • Since we are listing the entire bucket, the call will result in keys for the directory also. Something like the following. Hence check for the key containing a file instead of a directory and keep adding such keys to a list (like performing a simple 'contains(".log")' check)
          web-logs/2012/
          web-logs/2012/12/
          web-logs/2012/12/10/
          web-logs/2012/12/10/i-7a3flcd3/
          web-logs/2012/12/10/i-7a3flcd3/tomcat.log
          web-logs/2012/12/10/i-9d9dedf2/
          web-logs/2012/12/10/i-9d9dedf2/01/
          web-logs/2012/12/10/i-9d9dedf2/02/
          web-logs/2012/12/10/i-9d9dedf2/03/

Once we have entire list of Object Keys to restore, the next step is to initate the restore process for all the Objects

RestoreObjectRequest requestRestore = new RestoreObjectRequest("my-global-logs", "<object-key>", <restoration-period>);
s3Client.restoreObject(requestRestore);

Once the above request is initiated for all the Objects, Amazon Glacier takes about 3-5 hours to restore the Objects and make it available in Amazon S3. We can then run Elastic Map Reduce jobs with all the required data.

Things to remember / consider
  • Archiving and Restoring are S3 operations and hence are part of S3 API
  • If you have data stored in Glacier that weren't archived from S3, then to restore them, you should use the Glacier API to initiate downloads. See the steps outlined in AWS documentation for downloading an archive
  • Restored objects by default are stored under "Reduced Redundancy Storage"
  • If you have millions of Objects in S3 that has to be transitioned to Glacier, be aware of the cost of restore requests. Eric Hammond has put across a very detailed analysis here
  • Glacier is designed for Archival Storage. Meaning, you do not access the data frequently and can wait for accessing the data. Any download request from Glacier, will take 3-5 hours before it is available. Hence carefully choose the archival policy. If you plan to retrieve the log data frequently, Glacier will not be right choice and will prove to be very expensive (since it is not designed for frequent retrieval)
Log Management Solutions
There are plenty for log management solutions that are available as a service and can be plugged in to existing applications and cloud environment.
  • Splunk is a widely used log management and monitoring solution. Splunk can be setup on a server and can be easily configured to start collecting data from web servers. A SaaS version is also available where the service is completely managed by Splunk
  • Loggly is another cloud based log management solution that is available as a service
  • There are also open source solutions available such as LogStash that can be customized for our needs
That brings to the end of this series on what I wanted to cover as part of log analysis using S3 and Glacier. Logging is an essential component in any system and in the era of Cloud Computing, a good log management solution will prove handy. Once the problems of scale and performance gets sorted out with the help of Cloud Computing, the immediate next need of any system would be to have an effective way to look at the system and analyse at scale. A log management solution will definitely prove handy.